Air Temperature Control Modification by Toby Erkson

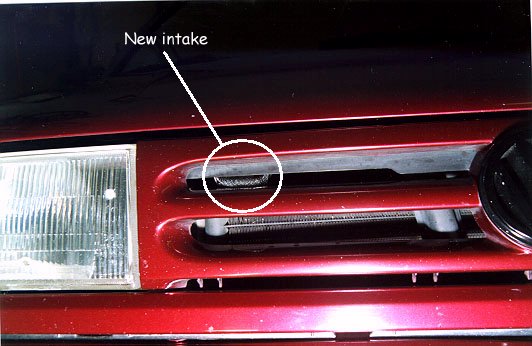
My original set up. During testing this modification gave no real performance increase that I was able to measure with my accelerometer (0-60mph and hp tests). This is no longer being used as pictured. Instead of the opening being located on the grill I installed Kamei air scoops in the bumper and routed the air from them to the ATC intake (pictures below).
Jump to Getting It Straight
Misc. I bought a MityVac for bleeding brakes and it came with a vacuum/pressure gauge that shows "Hg (inches of mercury)...cool! Here's some readings I took.
Intake manifold at idle: 20.5"Hg. Snapping throttle would dramatically reduce vacuum (naturally). Full open throttle registers zero vacuum.
Air temperature control (ATC) flap (vacuum operated) in air box (engine at operating temp)...
- ...just begins to open at 2"Hg
- ...seals against front air intake opening at 5"Hg
- ...seals tightly against front air intake opening at 9"Hg
Just measuring from the air box vacuum port (flap actuation vacuum hose not connected) for the ATC began at 2"Hg and settled to 5"Hg. Snapping the throttle would reduce vacuum (needle would drop to 0"Hg).
With the vacuum gauge T'ed into the ATC vacuum hose I drove around and monitored the vacuum (my custom modification still intact). The gauge read a constant vacuum, ranging from 3 to 9 inches of mercury, with throttle position and power levels not making any difference that I could tell.
04Feb2000
I piped in my vacuum gauge into the ATC line and mounted the gauge itself on the shelf in the instrument cluster. Then I wrapped the ATC flap with tin foil and the main air intake (front opening in air box) as well. I routed a wire from each tin foil section in to the cabin, connected to my continuity meter. When the ATC flap closes on the main air intake the tin foil "switch" would be made and there would be continuity in the circuit, thus my meter would emit a tone. This would allow me to watch my instrumentation and vacuum gauge while listening to when the tone sounded, thus telling me the flap was closing the main air intake and allowing air to come in from the ATC opening.
Here are my notes:
- For all tests, engine at operating temperature and outside temperature in the low 50's (F).
- My custom intake (ATC air coming from grill), ATC system otherwise intact-
Vacuum stayed pretty constant at 7"Hg; under sudden full throttle at hi-rev the tone would stop just briefly (less than a 1/2 a second) and vacuum would decrease a very little bit (about .5"Hg).
- Engine off-
Vacuum held steady at 7"Hg and tone was still present. Vacuum very slowly decreased. I put an industrial fan on the engine to rapidly cool things and the vacuum decreased quickly. At 5"Hg (and less, of course) the tone stopped.
- ATC vacuum hose not connected (thus ATC flap would not operate), vacuum reading taken from the air box port where the ATC vacuum line would normally connect-
Some minor fluctuations but held fairly steady at 6"Hg. Full throttle would drop vacuum some. No tone the whole time.
- Stock ATC system set up (factory set up)-
Engine was a little cool (I put the fan on it) and on start up there was tone at 6"Hg. Once engine was at operating temp the vacuum dropped to 4"Hg and tone was intermittant. After a few seconds there was no tone. Idling produced 3"Hg to 3.5"Hg and cruising vacuum was 3"Hg. Mashing throttle to high rpm then hold rpm, vacuum would go from 0"Hg to 3"Hg. Only a couple of times would I get tone but it would quickly end.
Okay, so what do these tests tell us? First, the stock ATC system is vacuum operated but temperature controlled! A mechanical temperature switch controls the amount of vacuum allowed to move the flap since there's almost always a vacuum in the air box. Second, if only cool air is allowed into the ATC intake while the ATC vacuum lines are still connected, there will be no real performance increase. This is because the ATC intake is smaller than the main air intake. So, my modification above actually decreased my power potential because I still had the ATC system functioning.
Getting It Straight! The ATC, or Air Temperature Control, is used to control the temperature of the intake air. Since the vast majority of cars are engineered for the average driver we must remember that we enthusiasts are the minority! Always remember this when questioning the engineering of a stock car.
The ATC receives it's vacuum signal from the top of the airbox. Because it's a vacuum, there's potential for debris to get sucked in to it so it's placed at the top of the airbox where it receives filtered air. Makes sense. You will see two vacuum lines coming from the top of the airbox. The one that goes to the ATC can obviously be removed when the ATC is removed, just make sure you cap off the nipple on the airbox so unfiltered air doesn't get sucked in. The other vacuum line is part of the fuel evap. system and needs to remain connected as it is part of the emissions system. If you decide to remove it, like in a cone filter configuration, be sure to cap it off also. Some are connected to the intake header and thus you don't want unfiltered air to get sucked in.
The mounting point on the airbox top is where the temperature control is because the intake air temperature is more representative here than in the ATC canister. Warm air is introduced in to the intake air for a couple of reasons, the primary one being to smooth out throttle response. By keeping the air warm, less fuel is needed, so fuel economy is assisted. We know that the colder the air the more dense it will be, more fuel can be used with it, and more power will be produced.
Many think that the ATC assists in engine warm-up but I disagree. Here's why: The temperature during combusion is well over 1000-degrees F, probably closer to 2000-3000-degrees F. So, how is going from 70-degree F intake air to, say, 150-degree F intake air really going to make a difference? In fact, because with colder air there will be more fuel being added to the combustion process, which will allow more energy to be released (as heat), the warm-up time required will actually be reduced! Also, the cold-start system in a car is, well, a different system, just as the ATC is a system motivated by only itself; there's no connection between it and the ECU or the EGR or PCV or anything else! All it does is control the air intake temperature regardless of what else is going on in the engine. Period! If you still don't believe me then you can read about it in the Haynes shop manual, page 4B-2, as well as in the General Information section of that chapter.
So you see, it's not really all that mystical of a system! If you are looking for a little more performance then toss it -- you will get better throttle response, more intake air for more power and a little more intake growl. Come on, you got that sport suspension that gives you a bumpier ride and those low-profile tires sure don't help so what's your real excuse for not removing the ATC? :-)
Removing the ATC flap: To remove the flap, open up the air box so the ATC flap is exposed. Very carefully and slowly lift the long plastic tab that holds the flap hinge while gently pulling on the ATC flap. The top part of the pin will become free of the tab hole. Now carefull lift UP on the flap. This will free the lower hinge pin as well as slip the flap free from the ATC vacuum can rod. The rod is not snap-locked in the flap, it's actually enclosed; this is why the flap needs to be lifted up. Don't worry, it's very easy to remove the flap. I was scared I was going to break something but it all came out rather easily!
ATC removed-1
ATC removed-2
ATC removed-3
ATC removed-4
ATC plugged inside the box. I just used a screw to plug the line
I still keep my vacuum lines attached to the top of the air box
I installed the Kamei air scoops in my front bumper (pictures below). I then connected them with radiator hose to pipe the cool air in to the ATC intake, but I then removed the ATC flap. (NOTE:Even though I used the Kamei air scoops, my original ATC cool intake (pictured above) would have helped with performance with the ATC system removed.) This does several things: 1) By keeping the vacuum lines connected the ATC system still works and the flap can be re-installed if the need should ever arise, 2) Since the flap is removed cool air enters into the air box by both the main air intake and the ATC intake, 3) It's a simple modification that the home mechanic can do to help increase engine power and, when coupled with a high-flow air filter, will more than likely give performance equal to a cone filter. In my opinion this is better than a cone filter due to lower costs, greater retention of stock parts, and always cooler air than what a cone filter would suck in and probably so even with a non-sealed heat shielded cone filter. Induction noise levels will be only slightly higher than stock and definitely quieter than a cone filter (my preference).
And remember, the stock air intake is in a naturally pressurized location, thus air is pushed into the air box. Why not take advantage of it by keeping the stock air intake intact!
29NOV00 (and 18Nov02)
Update: I passed the Oregon DEQ sniffer test on the state dyno with flying colors! The P-Chip and my air box mods aren't killing my emissions, just helping the power output. No cold-weather problems, either.
07DEC00 Kamei Air Ducts
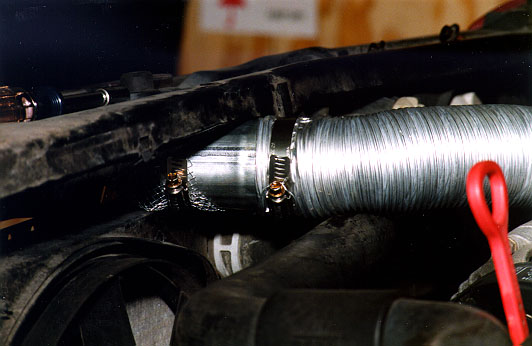
I used a large diameter radiator hose that I bought from a Napa Auto Parts store. I believe it's for an 18-wheeler or similarly large truck. It was $19 for just one and it has a preformed 90-degree angle in it. The hose fits snugly and perfectly around the Kamei air duct! Note: I did punch a hole in the Kamei duct where the tab snaps in to the bumper and used generic safety wire to tie it in place behind the bumper. The ducts don't 'snap' into place securely and I already lost one. It's super simple and I recommend doing it. There are plenty of little gaps in that area where one can thread the wire, just look and think, it's worth the extra 5 minutes!
Air enters the Kamei air duct and goes into the radiator hose. From there it goes up into the flexible muffler piping. The air then makes a U-turn down into the air box where the ATC opening is.
Kamei intake duct in bumper. Radiator hose fits over duct opening (camera flash used so you can see inside the duct).
Radiator hose fitment. The radiator hose fits quite nicely! It's length was trimed down so the hood could close with the large diameter ducting installed.
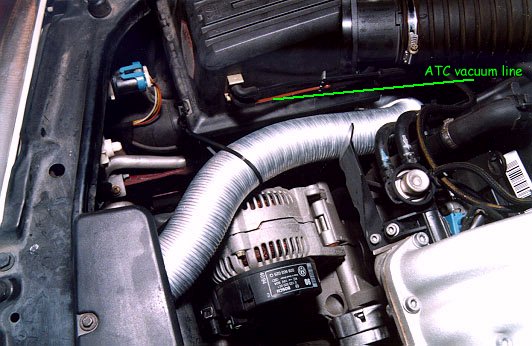
How it looks installed. Flexible muffler piping is used for the straight pipe and the two upper 90° pipes are hard street pipes and the lower 90° pipe is a flexible street pipe. Plumbing supplies from Home Depot Motorsports.
Another view.
I also replaced the restrictive main air intake snorkle that goes from the fender to the air box. It's the same piping from Home Depot Motorsports.
Exploded
Together
Installed