Type Three Tuning Page -- Transmission
Please select the area of interest:


Stock
Automatic: A complete rebuild kit for a type III A/T is $90 and includes
all seals and clutches. The only things not included are the brake bands. These
are about $15 each new.
For purchasing these parts a recommended company is "ADC Distribution Group".
Most parts in the kit were original VW (I don't know how they do it). They can
also build torque converters from scratch.
Go to their Locations page at www.atcdg.com
to find the location nearest you.
Another place for tranny parts: http://www.makcodistributing.com/
Here is the consensus of the group regarding towing: Tow with all wheels off
the ground.
Manual Transmission
Can be towed with the rear wheels on the ground without any problem. The tow
dollies (two wheels on the ground) are a bit less stable than the full trailer
(all four wheels off the ground), but are substantially lighter if towing
capacity is an issue. Plan on the T3 to being 2200lbs. Add the weight of the
trailer or dolly and check your capacity.
Automatic Transmission
Should be towed with all four wheels off the ground. If this is not possible,
then the drive shafts should be disconnected at the transmission. The automatic
transaxle lubrication pump is driven by the "running" engine. If I remember
right, the manual recommends towing it less than 30miles at no more then 30 mph
in emergency situations or towing backwards (front wheels only on the ground).
Towing backwards (front wheels only on ground)
Not recommended except for short, low speed tows. The caster is all wrong when
going backwards and the tires would tend to wander, putting a lot of stress on
the steering lock.
The Type 3 automatic is a very solid transmission. They are known to go for over
100k miles with no problems. The worst problem can be the torque converter seal
leaking, and there is a trick to fixing that: Put 2 seals in it. They did not
like being run low on fluid. The transmission is actually made by Borg Warner,
and the same basic guts are still used to this day by VW and Audi. Auto-Sticks
were good too if properly maintained, and adjusted. Just a little harder to work
on. The auto-stick was just a manual trans that had been modified with a vacuum
clutch and torque converter.
Russ Wolfe
Factory trained VW mechanic since 1965
http://wolfenet.net
Automatic circuit diagram.
MT gland "nuts" are commonly available since beetles used the same part, but the type 3 AT ones are not. However, you can convert an MT to an AT by knocking out the bearing inside and shaving 2mm off the thickness of the head. That might be easier than trying to find the correct part somewhere and getting it shipped to you.
In general, they are infinitely reusable.
Jim Adney
From the VWType3.org email list
More automatic info taken from The Shop Talk Forums, author Ray Greenwood.
Content has been edited for readability:
It really helps the drivability if you properly adjust the automatic, including
main pressure and bands. Get the Bentley. Rarely does anyone make the proper
adjustments. They run very well when adjusted properly. Anytime you greatly
change the engine -- thus creating a new vacuum signature -- you must re-adjust
the modulator valve.
While you have the tranny out, replace the seal between the transmission and
final drive. Takes about 10 miutes and 4 bolts. They only last 7 years or 70k.
When they fail the tranny is toast within minutes.
The transmission uses hydraulic pressure valves to control the shift. Those have
an rpm governor that helps to keep the hydraulic pressures stable. Also, a
corrective device is the modulator valve. That is vacuum operated but is also a
tuning device. It is a further method of hydraulic pressure to the governor
stable. They work as a group. The modulator valve is an input of sorts for
throttle position and load while the governor sets range and rpm points. I don't
have my book close to me so I can't remember at which pressure the modulator
valve modulates. But, the pressure can be checked with gauges and adjusted on a
turbo engine to be able to run correctly. It may be worth looking at the Bentley
for soemthing like the Saab turbo or the Audi turbo to see where in the manifold
they pull their vacuum from and what kind of readings are required. Usually you
do not adjust to vacuum readings. You generally drive and adjust using a guage
and a long hose. In the Bentley manual, it shows several points on the tranny
case that have plugs in them. These are just for checking pressures
The Type 2, 3, and 4 automatics all use a Type 003 (Type 3) geabox. Now, that's
the automatic portion of the transfer case mind you. The Type 2 uses a different
differential section. The Type 3 and Type 4 use the same differential case. But
bear in mind that there is an early and a late output shaft style for the
differential cases. That being said, ALL of the Type 003 automatics in Types 2,
3 & 4 have a cast iron differential gear carrier. Freaking work of art! The case
is aluminum...or magnesium...whatever, but after you pull the tranny and the
torque converter you will see the cast iron plate with about 8-10 bolts behind
the torque converter.
Remove the stub axles and the 10 bolts behind the torque converter and the whole
differential carrier, complete with meshed pinion shaft, will drop out in your
hands. The bearings, pinion shaft, differential and ring gear assembly are
totally separate from the tranny case in their own cast iron carrier. They do
not transfer their load to the aluminum case except at the 10 bolts on the bell
housing, with rotational force.
Hal Sullivan wrote:
The early Bus ('73-'75) automatics and the Type 3/4 automatics are both "003"s.
The Bus final drive (differential carrier) is quite different from ours, but the
actual transmission is nearly identical.
This all goes out the window with the '76-later Bus & Vanagon which used the
010/090 automatics; those are a different beast altogether.
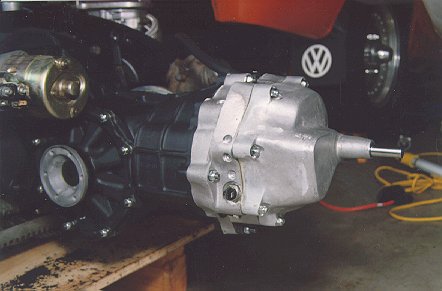
Custom
Mike's advice for installing a Porsche 911 or 914
5-speed tranny.
The 912E used a Porsche 923 transmission (only about 2000 examples were ever made).

A Porsche 901 transmission is a semi-common conversion to VWs.  It requires
a bit of custom fabrication, but not a whole heck of a lot, and it is far
cheaper than a Berg 5-speed or equivalent.  The 1964-69 911 and 912 cars
used "901" and "902" transmissions, respectively (same basic construction,
just some had 4 and some had 5 speeds).  The 1970-71 911 used a "911"
transmission, which is a modified 901 setup.  Slightly stronger case.

The Porsche 915 transmission is a whole new animal - all different internals
and case and everything.  It's much more durable than a 901. However,
Porsche decided to use a pull-type clutch on these.  That means that instead
of activating the clutch by pushing a throw-out bearing from the outside in,
it pulls it from the inside out.  This makes for a big hurdle for VW
conversion.  There were a couple different variations spanning their 1972-86
use in the non-turbo 911.

The Porsche 923 transmission is basically a 915 with a 901 bellhousing.  How
convenient :-).  It was used in the one-year-only car, the 1976 Porsche 912E.
Shad Laws
The Gene Berg Five-Speed Tranny
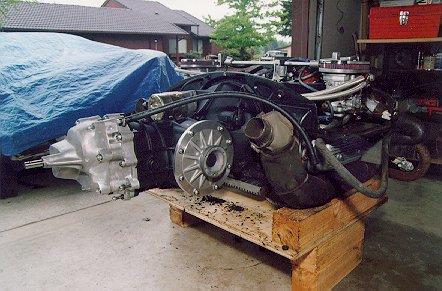
A five-speed transmission is a great modification that clearly makes an
air-cooled VW stand out (provided people know about it, heheheh). I created my Gearing Analyzer to help me figure out my gearing.
Regearing a transmission is no simple task. Great care must be exercised in
selecting a combination of gears, ring and pinion (R&P) and wheel diameter. The
Type III is particularly difficult to work with since the fan cannot be changed
like an upright motor (like the Type I) to vary the cooling intake. If you start
deviating from stock too much you may start to have cooling issues.
Here is the 2.5Mb MS Word document I
sent Clyde Berg on what my mechanic (Doug Powers, retired) and I did.
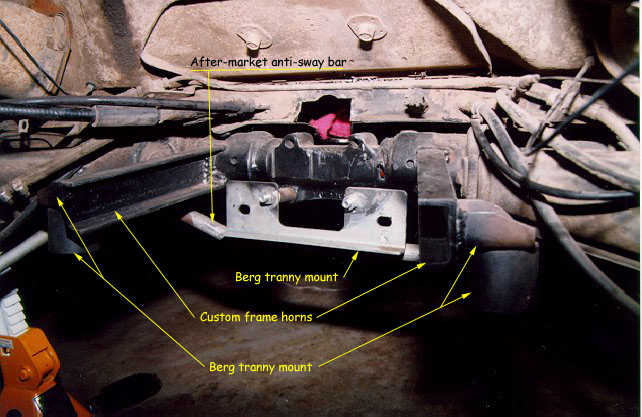
>I see you have
>IRS. And from your note I understand that you fabbed your tranny "horns"
>by using some "u" channel...did you use the stock engine "carrier" or
>did you modify a berg engine support? What do you think about cutting a
>set of horns out of a donor pan and welding them in vs the "u" channel?
Yes, I still use the engine carrier. I doubt the stock frame horns would work
since they extend further back than the Berg tranny mount. However, you *may* be
able to modify their tranny mount to the stock frame horns. You need to have all
the parts and find out for yourself (kind of a spendy way just to figure
something out :) or you might call up Gene
Berg Enterprises and ask to speak with Clyde Berg about it. He's very busy
so try to have your questions thought out ahead of time.
Glenn Ring's 5-speed for
his Type I. Shows good pictures of the 5-speed kit.
My Conversion from an Automatic to Manual Transmission by Craig Woolston
(Copied from the TYPE III email list)
Overview
Remove engine and automatic tranny, drill two holes in firewall, drill shift
tube access hole, replace pedal assembly and shifter assembly. Add clutch cable
tube, cable and manual transmission. Put engine back in and drive. Sounds easy
enough, eh?
Background Notes
Probably what made this the easiest was having a donor Manual transmission car
sitting in the weeds beside the house. The donor was a 1969 rust bucket Square
and receiver was a 1970 Square. So it was easy to check measurements and look at
how it was done. But I believe that it wouldn't be that hard if you didn't have
an example sitting beside your car.
Heavy Metal
After removing the engine and the automatic transmission you can now get to the
firewall and if you leave the car on the jack stands from removing the engine
you can also get to the underside of the car much easier. Since I had the donor
car sitting right next to the receiver I could do quick compare measurements but
I believe if you strip the donor car of it's parts you could do all the
measurements up front and then never need the donor car again. Therefore I will
only be giving approximate measurements here since I didn't ever write them
down.
So with your electric drill and a 1.5" holesaw drill a hole in the firewall for
the shift tube to exit the tunnel to the transmission. Note here that the hole
extends below the firewall so that it's not a complete circle in the firewall.
That way it's just like stock. With a 3/8" drill, drill a hole next to the
throttle cable tube for the shift cable tube.
Since we are to the clutch cable tube I will give my humble opinion on my
solution. I was told this was the hardest part, involving welding, sweating,
cursing and on and on. After close inspection I decided to use 3/8" stiff copper
tubing. This is the only non-stock item in this conversion.
The 3/8" stiff copper tubing is a little uncommon so your local Home Depot won't
have it. I got mine from the local plumbing supply house. What's interesting
about this tubing is it's 3/8" OD not ID like the stuff you get at Hope Depot.
I'm not a plumber but the guys at the plumbing shop told me that when you get to
3/8" stiff tubing and below the diameter is measured as a OD and no longer a ID.
1/2" and above is measured ID.
The Bowden tube (now I remember what's it's called) fits right over the copper
tubing that I cut to stick out from the firewall the same amount as the donor
car. Unless the copper tube is secured to the pan, the tension on the cable will
push it forwards. It must be secured, or perhaps it just moves until the sleeve
on the front end of the Bowden tube slides forward enough that it is stopped by
the firewall. If your tube slips, it will change the slack in the Bowden tube
and this will change the clutch action.
Note by Jim Adney: "I would be concerned that this will not last. How thick is
this flat panel that is now taking this stress? I suspect that it will slowly
deform until the Bowden tube pushes through. This is why this tube is securely
anchored in the original version. To do this properly it must be steel so it can
be welded to the bulkhead and the tunnel." The clutch action was confirmed by
the author to be changing.
As it turned out this was a fantastic size as when this got installed it snapped
into the holders in the tunnel and didn't require any external fastening. It is
a little bigger than the stock size but who cares, there is plenty of room in
there. We just needed a guide tube for the clutch cable anyway.
Next with a 4" holesaw drill a hole in the underside of the car having the
radius of the hole just tangent to the firewall. You can then use a grinder to
elongate the hole to match the cover from the donor (which I did), but in
retrospect I don't think that it is necessary and the cover hides the hole just
fine. Plus you have avoided all the grinding. Using the shift tube cover as a
guide drill holes for the cover to mount to the underside of the car. Since the
cover hides the hole, no one would ever know it's not stock.
That's all the heavy work. I'm assuming that all cars come with a front access
port in the tunnel.
The Transformation
The first thing to install is the clutch cable tube. As I mentioned above mine
just snapped in, no mess, no fuss. You do need to cut it to the correct length
so there is slight overhang on the firewall to pickup the clutch cable tube from
the firewall to the transmission.
Next remove the old pedal assembly. Remove the old shifter. While all this is
off I threaded the shift cable down the new tube. This can really be done
anytime but it was easiest right then. Now I'm also assuming that all cars come
with the same tunnel mount for the shifter as mine did. And that was VW
converted the normal manual stick shift mount to a automatic mount using an
adapter plate. Anyone know if this is isn't true? (Answer: The first AT cars did
not have this feature. It only started in 70. I think earlier cars will be
harder to convert. ~Jim Adney)
Remove this plate. Now in order to convert the tunnel to accept the manual shift
stick mount you need some nuts for the bolts to screw into. For you welders out
there this is probably a simple job but I hate flames so I copped out and used
some JB Weld. I know, I know it's not the best but I think it's okay for this
job. You just need something to hold the nuts while you get the bolts started
later. You could probably get a nut and wrench on them later through the front
access port in the tunnel but that is a lot of arm twisting. Speaking of the
access port...
Next remove the front access port to the tunnel as well as the spare tire and
the access port in the front fender. You probably already know this if you
stripped the donor car yourself rather than bought the donor parts already
removed. Insert the shift tube through all these holes. When the shift tube is
to the shifter hole you need to feed it through the shift mount.
Next bolt the shifter mount to the tunnel and install the new pedal assembly.
Connect the shift cable to the pedal through the front access port. Bolt the
shifter down and then start thinking about making engine noises since were
almost home free.
Install the transmission. Connect the shift tube to the transmission through the
4" access hole already drilled. Install cover over access hole. Install the
shift cable tube between firewall and transmission and bolt to transmission.
Adjust the sag in this tube per VW service manual.
Remove the old flex plate from the engine. Throw the torque converter as far as
possible making sure it does land on your toes. Install the new flywheel, clutch
disc and pressure plate. Get the plastic spline tool to line this stuff all up
as it is much easier than eyeballing it. Can anyone actually do that and get it
right? And finally put the engine in the car. Adjust the clutch and go for a
test drive. Yea!!!
I have to admit that these cars are a lot more fun to drive with a stick. I wish
I did this conversion years ago but live and learn. Hope this helps some. I'd be
happy to answer any question I can. Below is a shopping list. I did it from
memory so no guarantees.
Anyway you need the following from a donor car. In parenthesis is whether I got
it new or used.
Manual Transmission (used, not even rebuilt since the donor was fine)
Manual Transmission mount (used)
Pedal Assembly for Manual Transmission (used)
Shift tube (used)
Shift tube to transmission linkage and cover
Stick shift (used)
Stick shift base and bolts (used)
Flex tube from firewall to tranny (used)
Flywheel (used)
Pressure plate (new)
Clutch disc (new)
Release bearing (new)
Clutch cable tube (new 3/8" copper)
Craig Woolston
craig.woolston@lmco.com
'70 "Converted to Manual Transmission" Squareback
'71 Automatic Fastback ("Casper")-will get converted the next time the automatic
transmission acts up
'73 "Wish I Was Restored and Not Sitting in the Backyard" Sqaureback